The bee pavilion is a universal design that facilitates the work of the beekeeper and wintering of bees. At the same time, the time to care for the hives is reduced. Any beekeeper will need such a structure, which is very simple to do with your own hands. No special skills are needed for this. It is only required to choose the type of pavilion, select the material and perform an accurate drawing.
Types of Pavilions
There are only three types of bee pavilions. Each of them has its own characteristics.
Stationary
The stationary pavilion looks like a small house. It is installed on the foundation, which can be either tape or columnar. Many beekeepers prefer this particular design, since it is possible to easily bring light, water supply and even install a sewage system into it. And in the winter - heating. These factors are extremely important when working with bees, because with the benefits of civilization, the process of cleaning for insects is accelerated, a favorable atmosphere is created - the bees do not get sick and work better in the spring.

There are pavilions without heating. But this does not mean that the bees in them are uncomfortable and cold. Heat will be enough if you place the building in the apiary so that the long wall is turned to the southwest or southeast.
Mobile
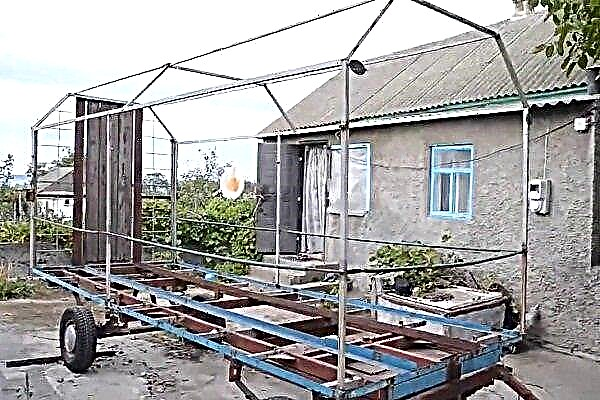
Mobile pavilions are most common among beekeepers, as they have wheels instead of a foundation in their design. Thanks to them, the pavilion is easy to move around the site. The base is usually a trailer from a truck or any agricultural machinery.

Sometimes the mobile pavilion becomes stationary. The structure is lifted with a jack from the supports and mounted on the base of the truck. Then they move closer to the honey plants. As soon as the honey collection season is over, the design is returned to its original place and the bees are arranged for wintering.
In mobile bee pavilions it is impossible to install a water supply system and sewage system. But here you can not do without lighting and heating. Electricity is supplied by cable from the mains.
Cassette
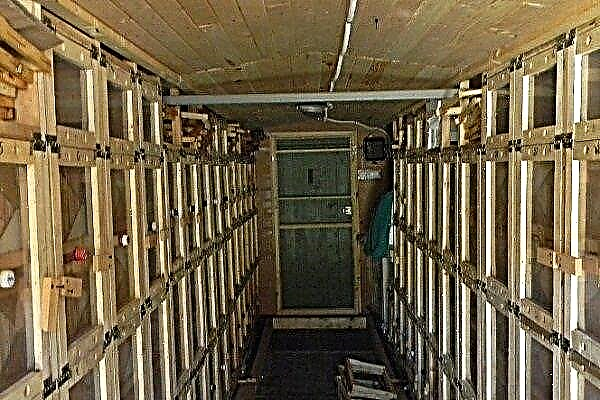
Beekeepers often call this type of bee housing an apartment building for bees, since up to 46 bee families can fit here. Beehives resemble lockers with drawers. This is extremely convenient, as each hive is in its place. It is easy to remove the frame with bees, process it from pests and diseases, and return it to its place without disturbing the rest of the inhabitants.

This type is both stationary and mobile. The cassette pavilion is very popular among beekeepers.
DIY making
Do it yourself is easy to build a pavilion. The whole process resembles the construction of a small barn. But in order to end up with a quality structure, you need to be patient and follow the steps.
Preliminary preparation
Before starting construction work, carry out thorough preparation, as this stage is extremely important. Consider the design of the future honey insect house. Solve the issue of size, because it will take quite a lot of space to fit a few bee families. But remember that it is better not to place more than twenty cluster hives, as the bees will be crowded.
Next, the plan includes ventilation, heating and sewage systems. Any professional beekeeper in his pavilion will build special compartments where it is convenient to place work clothes, tools for pumping honey and for cleaning. Therefore, enter these rooms in the drawing.
An example diagram of a stationary pavilion looks like this:

It shows:
- 1 - folding trestle bed;
- 2 - boxes for storing cells;
- 3 - corner table;
- 4 - a table for work;
- 5 - honey extractor;
- 6 - nests;
- 7 - a vent.

Sample drawing of a mobile pavilion:

Here you see:
- 1 - wheel;
- 2 - platform;
- 3 - box;
- 4 - brake system;
- 5 - electrical system;
- 7 - compartments for hives;
- 8 - the beekeeper's wardrobe;
- 9 - an office ladder;
- 10 - roof covering;
- 11 - hatch;
- 12 - exhaust shaft;
- 13 - letkovy gap;
- 14 - vertical separator;
- 15 - an arrival board;
- 16 - window;
- 17 - flying targets;
- 18 - volumetric figures;
- 19 - horizontal divider;
- 20 - technological ladder.

After the plan is ready, check it several times for the presence of all necessary elements, since if at least one detail is missed, the bees will feel bad, often get sick, and their performance will drop sharply.
Necessary tools and materials
Once the drawing has been developed, prepare a set of tools and materials. If the pavilion for bees is planned to be mobile, then a strong structure with wheels is required. A jack and a welding machine are also needed, as there is work to be done with metal.
It is best to ask for help from a specialist who knows mechanics and welding to build a bee house on wheels.
Both for the mobile and stationary pavilions, the following set of materials and tools will be required:
- boards;
- plywood;
- Fiberboard or particleboard (a couple of sheets are enough);
- wooden or metal beams to create a frame;
- measuring level;
- ruler or tape measure;
- a hammer, saw, nails, screws, hinges for doors and window structures, as well as fixing materials;
- material for the roof (roofing material or iron is a good choice);
- paint;
- insulation (ordinary polystyrene is suitable).
Compartment Making
The manufacture of compartments as well as feeders is an important stage in the creation of the pavilion. Typically, bee compartments are located in the same direction. But you can direct and in two opposite. A compartment for household needs is organized in an accessible and convenient place.
Bee feeders are placed indoors during the wintering season, when the collection of honey is completed. They are divided into two types: inside and outside.
Inside the zeros, in turn, have several types:
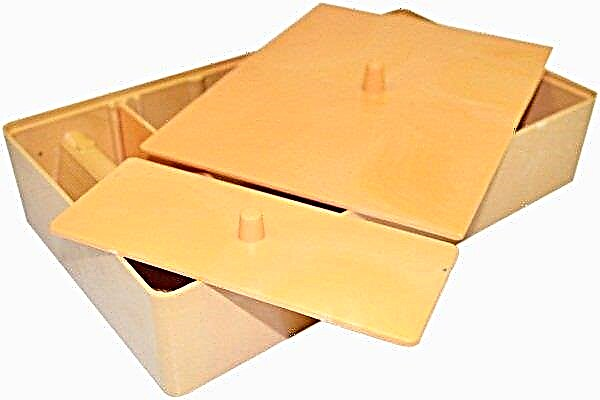
- Ceiling. It is an ordinary box that fills with food for insects without directly opening the hive. This type is suitable and convenient even for continuous feeding.
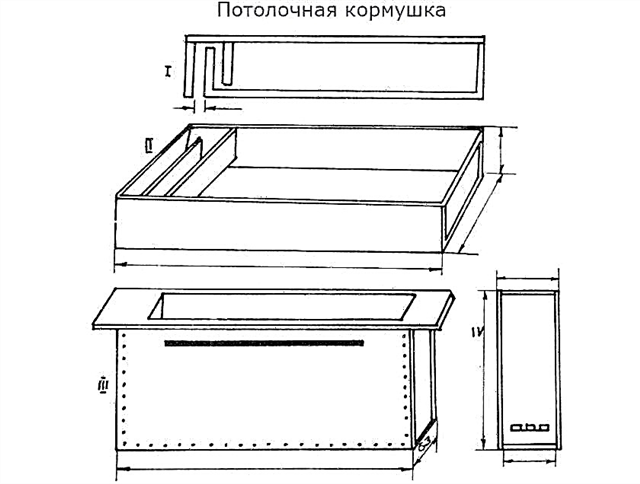
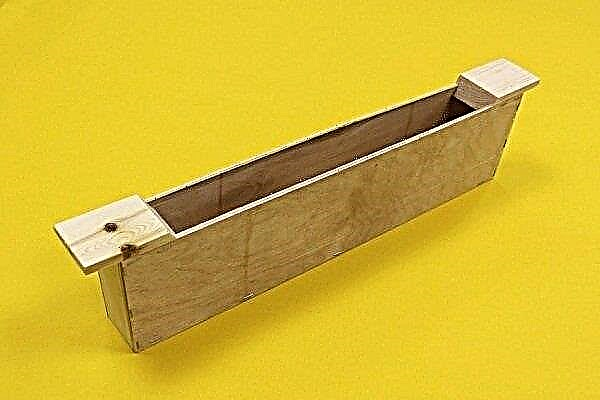
- Framework. This type of feeders resembles its appearance on the frame, the sides of which are processed with plywood. Location - at the nests. Such a feeding trough for autumn is very convenient.
- Ceiling plastic feeder with a glass inside. This type is considered functional. However, if you decide to establish this species, remember that insects can penetrate into the department with food.
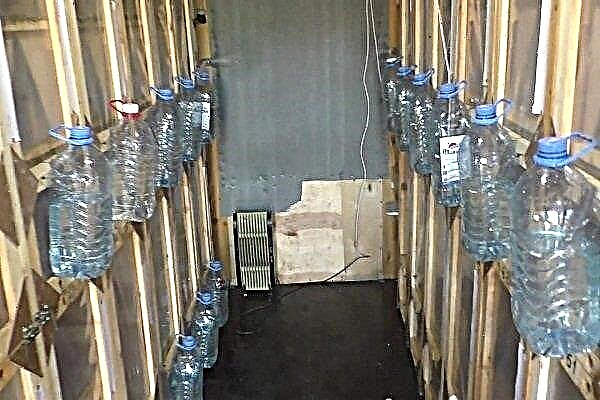
- From plastic bottles. Feeders from this container are similar to drinking bowls with a dispenser. This type is usually fixed at the bottom of the hive. Use best once.


There are only two types of outdoor feeders:
- Common. It is standardly placed near the site. Such a feeder is effective if there are no extraneous apiaries nearby.
- Hinged. This species is attached to the flyer. Advantage - there is no need to open the hive to put food for the bees. Minus - extraneous insects can fly in.
Lighting
For the convenience of the beekeeper, lighting is carried out in the pavilion. This is done easily: the wires are fed from the near transformer. It is best to organize combined lighting by installing fluorescent and incandescent lamps. The latter must be protected with shades so that the bees do not suffer from bright light.
Often, beekeepers do without light and use an ordinary lantern.
Beekeeper's closet
Be sure to have a closet in the pavilion for bees. Its size and location depends on the personal needs of each. If the structure is planned to be transportable, then the closet is best placed in the rear. In this case, it will be possible to settle more bee colonies. But in any case, this room should not be through, so as not to block access to the hives.
In the closet, design shelves or even a cabinet where all the necessary equipment for work will be contained. Also do not forget about the place where the products for feeding bees, dishes and frames will be stored. You can put a small sofa to relax and equip a compartment for cooking.
Warming
An important stage in the construction of the bee pavilion, which cannot be ignored, is insulation. Since the bees will winter in it for quite some time, you need to approach the issue thoroughly.
Wall insulation is a foam placed between two sheets of plywood. Carefully inspect the door structure and window frames. Cold air must not enter the crevices. If drafts are observed in the room, go in for insulation of doors and windows. To do this, you need to fill all the cracks and cracks with construction foam. If severe and prolonged frosts are predicted in winter, you can install a heater.
Ventilation
Ventilation is important for the health of honey insects, so pay special attention to it. From spring to mid-autumn, natural ventilation through the doors and windows is carried out in the pavilions.
In winter, a special ventilation system will be required. It can be both supply and exhaust with shutters. The system prevents the accumulation of moisture in the room, eliminates stagnant air and retains heat.
Security measures
Since the pavilion is a structure made of wood and plywood, all safety measures are taken. In a stationary and a mobile bee house, there must be a fire extinguisher, since an unexpected short circuit with fire can occur in the room.
The safety of the mobile pavilion requires a more thorough approach:
- brakes must be present in the design;
- if it is planned to contain more than 48 families, it is better to build several pavilions fastened together, which will allow unimpeded movement of buildings in the apiary.
Installation steps
The collection of a stationary structure is carried out in several steps:
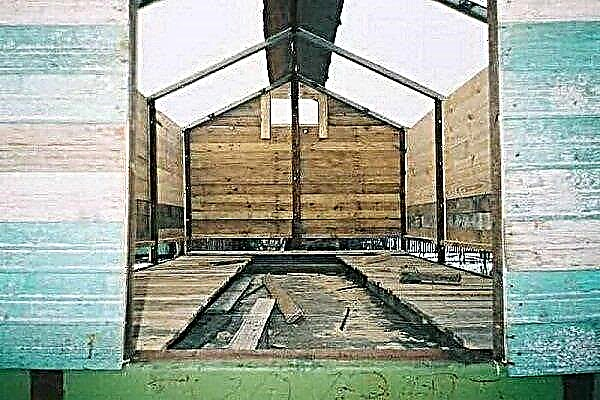
- The construction of the frame. This will require wooden or metal beams. Build the structure of the future pavilion from this material. Make sure that the height is not too low, since it will be problematic to go inside - you will have to constantly bend over, and in the room all the time be in a bent state. But a very tall bee house will be out of place - care for bees will be complicated.
At this stage, also make sure that the foundation for the stationary structure and the platform with wheels or the trailer from the car in the mobile pavilion are located exactly.
- Creating a floor. The flooring is made of boards. It is useful to impregnate the material with a moisture-repellent solution before laying - this will prevent rapid wear of the board.
- The construction of the inner frame. It is required to create a frame inside the pavilion, which will separate bee families from each other. The sizes directly depend on the size of the hives. During operation, rely on the prepared drawing and calculations.
- Placement of compartments. Bee compartments can be placed on both sides of the pavilion. The distance between them should be about 80 cm. If you place the compartments closely, then in this case the standard honey extractor does not fit between the hives.
- Designing a closet. Shelves are attached, a table, sofa for rest and other necessary things for comfortable work are installed.
- Warming and ventilation. At this stage, proceed to warming the pavilion and creating a ventilation system. How to do this, was said above.
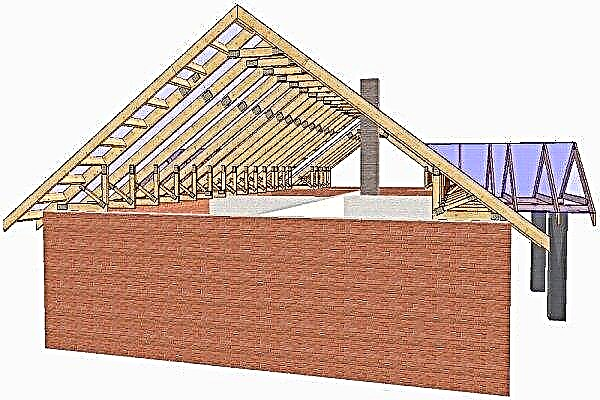
- The creation of the roof. The roof of the bee pavilion is an important detail in the stationary type. It is of two types:
- Gable. Such a roof is usually made without built-in hatches, so window structures are placed on the walls. Between cassettes with beehives and walls with such a roof you have to leave some space, which is not very convenient.
For this type of roof, the frame is first made of wooden or metal beams. In addition, Mauerlat, the base for the rafters, is attached from above. This is necessary to create a high-quality and durable roof.
Next, rafters are made of beams, the size of which is 5 cm × 5 cm. After they cover the roof with water-repellent material.
- Flat. This option is more convenient due to the presence of outward opening hatches. Thus, the windows on the walls are no longer needed, and the hives are installed close to the walls, which allows to save space. For the manufacture of such a roof, you need to prepare its drawing, which will indicate the number and size of hatches. The roof itself is made flat, which is clear from the name. The design cuts openings for hatches.
- Gable. Such a roof is usually made without built-in hatches, so window structures are placed on the walls. Between cassettes with beehives and walls with such a roof you have to leave some space, which is not very convenient.
- Pavilion equipment with doors and hatches. At this stage, doors are installed and hatches are attached. This is done using fixing material.
- Placement of beehives. They are set a little at a distance against each other so that it is more convenient to care for the bees and use the honey extractor.
- The manufacture of steps. If necessary, you can build steps in the pavilion.


Installation of a mobile structure has only a few additional steps:
- Step 1 - Find a suitable trailer or body from the truck.
- Step 2 - disassemble the design, leaving only the chassis.
- Step 3 - set the resulting "foundation" horizontally. Place stones or bricks for stability.
- Step 4 - if the body is made of iron, weld the frame prepared according to the size of the machine frame using a welding machine.
After you complete all the steps of work as in the installation of a stationary pavilion.
Pros and cons of design
The bee pavilion has a number of both positive and negative sides.
TO pluses Facilities include the following:
- Pavilions are very compact. The design can be built even on a small apiary.
- All year round there is a roof over your head. There is no need to place hives on the site and worry about insects during rain or cold snap.
- Even in a small pavilion there is the opportunity to settle many bee families.
- In the pavilion, it is convenient to inspect the bees and take care of them during the bezruzhno period.
- You can pull out the bees in turn for inspection, while not disturbing the rest.
- Harvest of honey increases several times.
- The mobile pavilion is easily transported to honey plants.
- There is a chance to collect honey of different varieties in one season, if you arrange one mobile pavilion for plants of different varieties.
- In the pavilion in winter a favorable climate is formed. Bees do not get sick, they develop well.
- The insect content in the pavilion is much safer for people and animals than in standard hives located in the apiary. Bees are in one place, do not fly around the territory and do not sting anyone.
Negative sides bee houses are as follows:
- High fire hazard due to the use of flammable materials.
- Indoor hives are usually located close to each other. This disrupts the coordination of bees, and they confuse their homes.
- If one bee gets sick, then in the pavilion the disease spreads very quickly, affecting all insects.
5 useful tips for beekeepers
The pavilion for bees must comply with all quality standards in order to protect insects and create a comfortable living environment for them. To do this, follow simple recommendations:
- Tip number 1. Use non-toxic materials during construction. Bees are sensitive to various kinds of chemicals.
- Tip number 2. Keep a fire extinguisher nearby, as in a fire all bees die quickly.
- Tip number 3. Try to create a safe atmosphere. If in winter you have to additionally heat the pavilion with the help of heaters, make sure that the device is absolutely safe. It is better to purchase an infrared heater.
- Tip number 4. If a mobile pavilion is used to house the bees, try to transport it as calmly as possible. After all, even the slightest stress provokes a decrease in the performance of honey insects.
- Tip number 5. So that the bees do not confuse their houses, and this often happens in a small room, paint the front walls of the hives in different bright colors. Insects will remember these guidelines and will always return to their places.
To build a pavilion with your own hands is a doable task. Housing for bees will turn out to be of high quality, if safe materials are selected for its production, the hives and feeders are correctly positioned, electricity is supplied, and the room should be properly insulated. In a properly built pavilion, it will be comfortable not only for bees, but also for the beekeeper.